购买一个域名和一台国外vps,并将域名解析到vps。搭建好 LNMP环境 ,php和数据库按个人需求安装。
lnmp安装完成以后,回到vps SSH窗口,执行命令
bash <(curl –L https://raw.githubusercontent.com/v2fly/fhs-install-v2ray/master/install-release.sh)
执行完后,修改 v2ray 的默认配置文件,路径是 /usr/local/etc/v2ray
编辑config.json文件,打开文件后先删除里面的内容,再粘贴下面代码进去并保存
{
  "log": {
    "loglevel": "info",
    "access": "/var/log/v2ray/access.log",
    "error": "/var/log/v2ray/error.log"
  },
  "inbounds": [
    {
      "port": 10000,
      "listen":"127.0.0.1",
      "protocol": "vmess",
      "settings": {
        "clients": [
          {
            "id": "000fe881-b655-4212-b804-b00f9970d5aa",
            "alterId": 64
          }
        ]
      },
      "streamSettings": {
        "network": "ws",
        "wsSettings": {
        "path": "/happy"
        }
      }
    }
  ],
  "outbounds": [
    {
      "protocol": "freedom",
      "settings": {}
    }
  ]
}
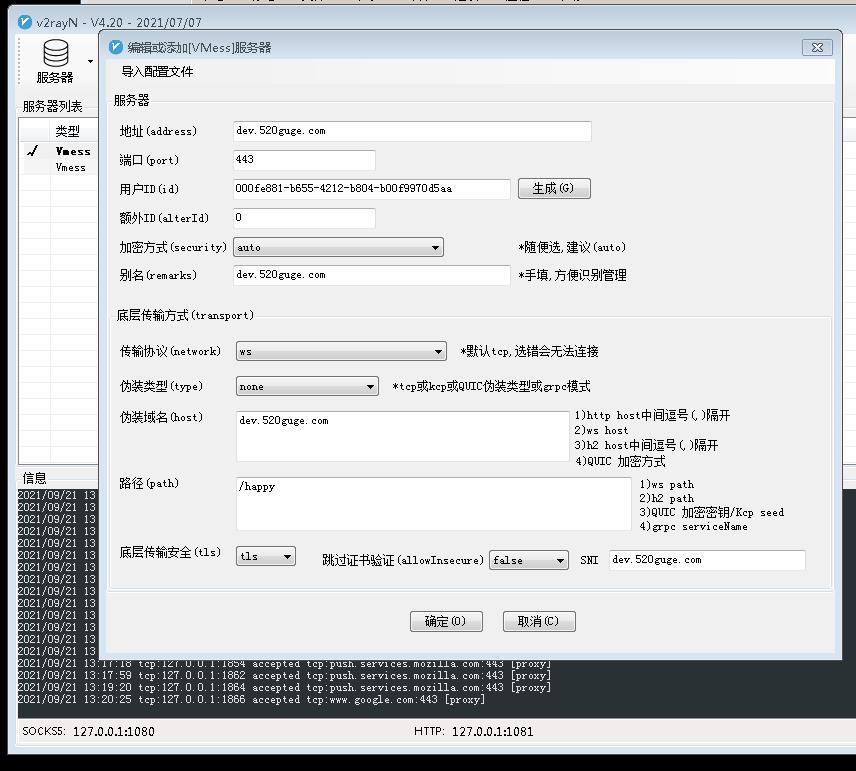
代码中的000fe881-b655-4212-b804-b00f9970d5aa可以变更一下。比如换几个数字。相当于是个密码。但是格式必须相同(小火箭里的UUID指的就是这串代码)

然后 lnmp vhost add 新建一个网站(域名是文章开头你解析的),申请SSL证书。
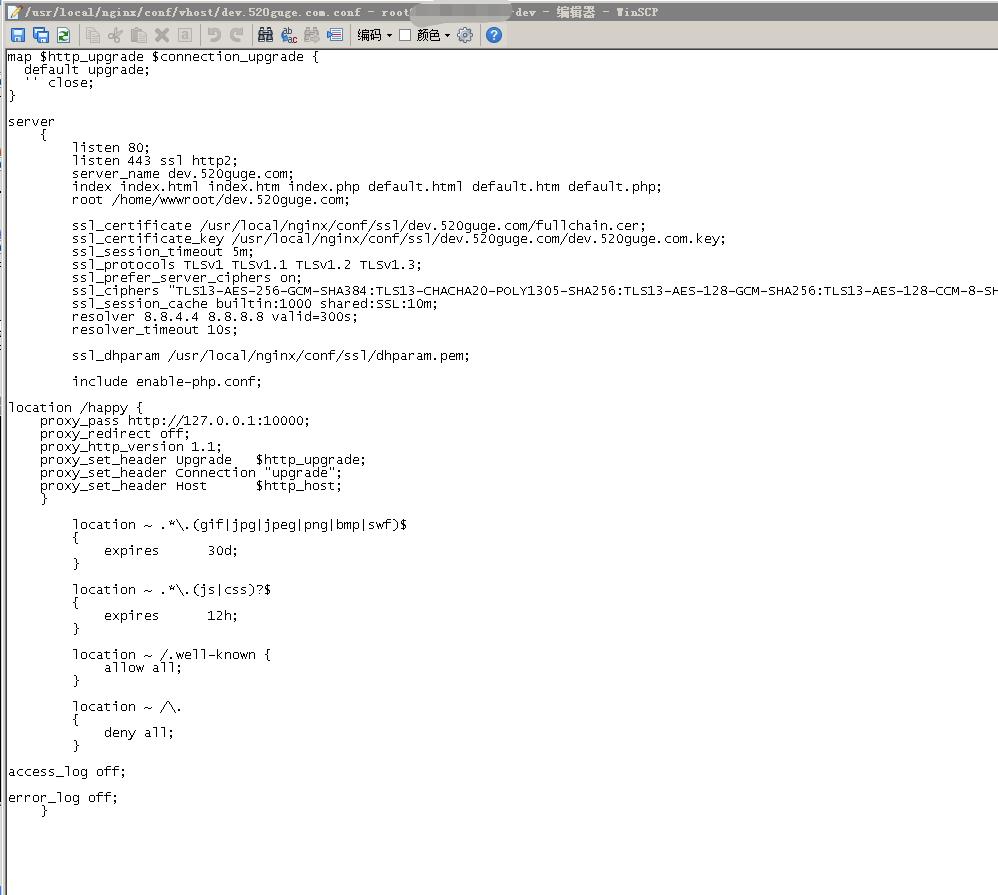
在 /usr/local/nginx/conf/vhost 目录编辑你的域名虚拟主机配置文件,修改你的域名配置。
map $http_upgrade $connection_upgrade {
  default upgrade;
  '' close;
}

server
    {
        listen 80;
        listen 443 ssl http2;
        server_name dev.520guge.com;
        index index.html index.htm index.php default.html default.htm default.php;
        root /home/wwwroot/dev.520guge.com;

        ssl_certificate /usr/local/nginx/conf/ssl/dev.520guge.com/fullchain.cer;
        ssl_certificate_key /usr/local/nginx/conf/ssl/dev.520guge.com/dev.520guge.com.key;
        ssl_session_timeout 5m;
        ssl_protocols TLSv1 TLSv1.1 TLSv1.2 TLSv1.3;
        ssl_prefer_server_ciphers on;
        ssl_ciphers "TLS13-AES-256-GCM-SHA384:TLS13-CHACHA20-POLY1305-SHA256:TLS13-AES-128-GCM-SHA256:TLS13-AES-128-CCM-8-SHA256:TLS13-AES-128-CCM-SHA256:EECDH+CHACHA20:EECDH+CHACHA20-draft:EECDH+AES128:RSA+AES128:EECDH+AES256:RSA+AES256:EECDH+3DES:RSA+3DES:!MD5";
        ssl_session_cache builtin:1000 shared:SSL:10m;
        resolver 8.8.4.4 8.8.8.8 valid=300s;
        resolver_timeout 10s;

        ssl_dhparam /usr/local/nginx/conf/ssl/dhparam.pem;

        include enable-php.conf;

location /happy {
    proxy_pass http://127.0.0.1:10000;
    proxy_redirect off;
    proxy_http_version 1.1;
    proxy_set_header Upgrade   $http_upgrade;
    proxy_set_header Connection "upgrade";
    proxy_set_header Host      $http_host;
    }

        location ~ .*\.(gif|jpg|jpeg|png|bmp|swf)$
        {
            expires      30d;
        }

        location ~ .*\.(js|css)?$
        {
            expires      12h;
        }

        location ~ /.well-known {
            allow all;
        }

        location ~ /\.
        {
            deny all;
        }

access_log off;

error_log off;
    }
保存,测试一下配置文件
/usr/local/nginx/sbin/nginx -t
重启 lnmp nginx restart
启动v2ray
systemctl start v2ray
设置开机自启
systemctl enable v2ray
Windows客户端 V2rayN,下载链接 http://dl1.junlin.li/v2/v2ray.rar
解压运行V2rayN文件夹里的V2rayN.exe,提示未安装.NET Framework的话去Microsoft官网下载.NET Framework4.6以上的版本安装好再重新运行V2rayN
V2rayN左上角点击服务器,添加Vmess协议
v2ray其他常用命令
启动
systemctl start v2ray
停止
systemctl stop v2ray
重启
systemctl restart v2ray
开机自启
systemctl enable v2ray
卸载v2ray
先停止v2ray
systemctl stop v2ray
systemctl disable v2ray
再执行一键移除
bash <(curl –L https://raw.githubusercontent.com/v2fly/fhs-install-v2ray/master/install-release.sh) –remove